
This rainbow design looks great on clear tips, but to show what we were doing we used a natural tip.
Equipment needed:
About 5 colour acrylic powders
Clear acrylic powder
White Nail Art Paint
Striping brush
#8 Oval Kolinsky brush
Your normal acrylic brush
Apply your tips as normal, you may want to do a reverse application with cover pink, then proceed to do this. Fill the ridge at the tip seam and buff back.
Using your colour acrylics start applying wavy lines, use a #8 Oval to pick up small beads of acrylic. Use the acrylic a lot wetter than you normally would because you only want to add colour, not ridges. Pull the acrylic up the nail, if your colour has spread use the point of the brush to push back into place or drag off the nail.
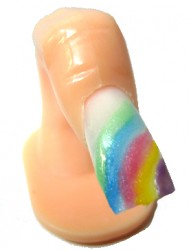 Continue adding colours butting one up against the other.
Once you have all your colours on, let it dry thoroughly. Buff down the entire nail with a whiteblock so that it is nice and smooth.
Using clear acrylic cap the entire nail area.
Leave this to dry completely. Give a gently buff down with a whiteblock so it is smooth.
Next step is to apply the white accent using nail art paint.

Using the striping brush start at the free edge of the nail and pull the acrylic paint up to form lines where each colour butts up to the other. The lines do not have to be exact and taper them off when you are heading towards the cuticle area. Add some small series of dots in between the lines. If you make a mistake with the lines, it is easy to fix by washing it off with water, letting the nail dry and starting again. You can finish by applying a gel top coat and curing it to seal in the paint or you can finish with a nail art top coat if you don’t have any gel.
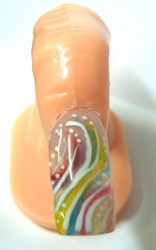
This is one we did on a clear nail tips, because the colours are lightly applied there is a degree of translucency which lends itself to the clear tips.